hugo+githubpages个人博客搭建
环境配置

在系统环境变量配置里面找到path新建一个hugo.exe路径
Hugo博客搭建流程
创建站点骨架
在hogo项目里面打开终端输入
hugo new site blog
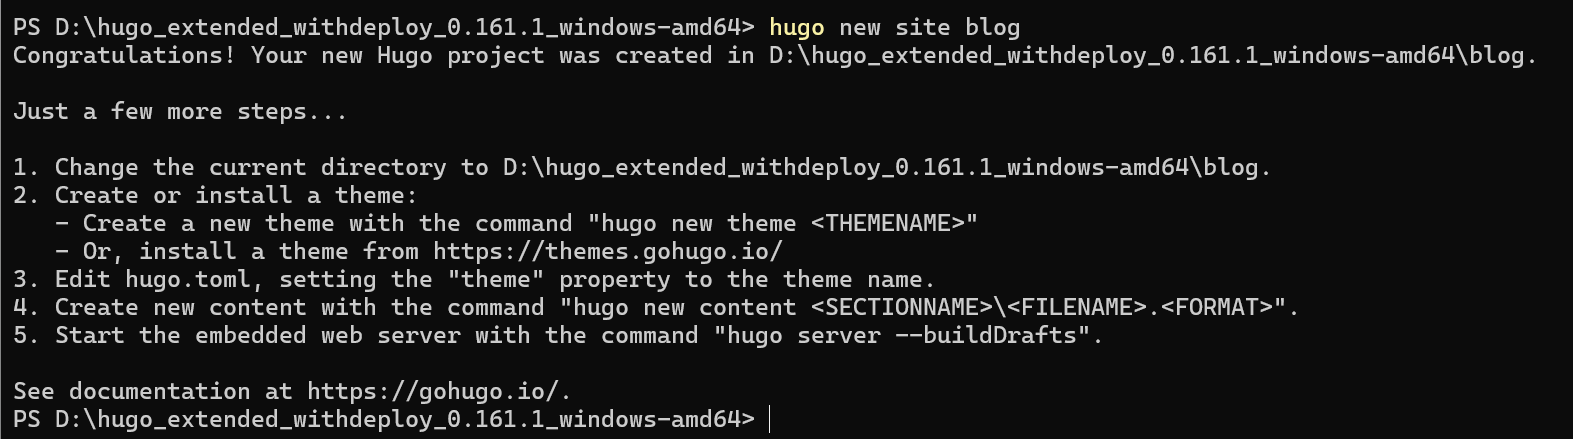
第二步就是初始化git仓库
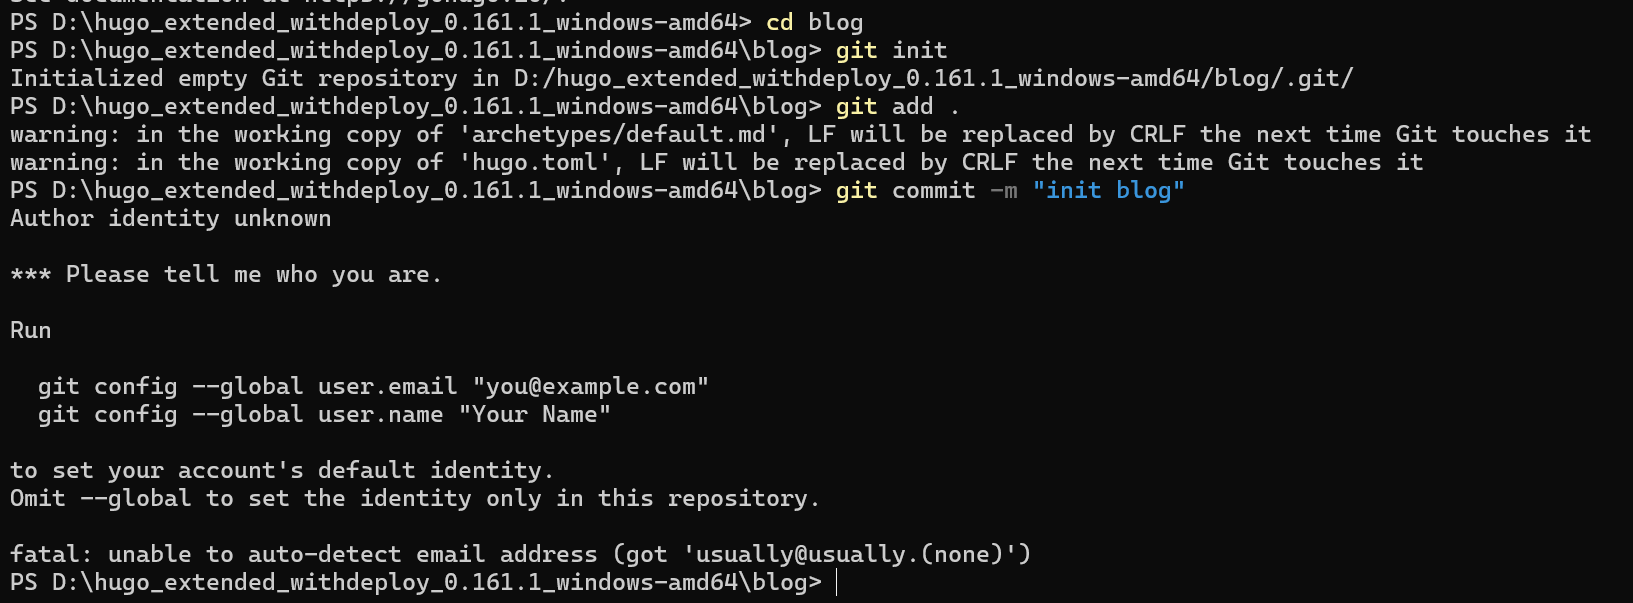
出现了please tell me who you are 说明 Git 还没配置用户名邮箱。这是第一次用 Git 很正常。

本地预览
第一步就是要去下载主题
再blog文件页打开终端,使用git命令拉取主题
git submodule add https://github.com/adityatelange/hugo-PaperMod.git themes/PaperMod
第二步在blo目录下面的.toml文件配置博客全局设置
baseURL = "https://usually885.github.io/"
languageCode = "zh-CN"
title = "usually885"
theme = "PaperMod"

[params]
  defaultTheme = "auto"
  dateFormat = "2006-01-02"
  ShowReadingTime = true
  ShowShareButtons = true
  ShowCodeCopyButtons = true

[menu]
  [[menu.main]]
    identifier = "posts"
    name = "博客"
    url = "/posts/"
    weight = 1

  [[menu.main]]
    identifier = "about"
    name = "关于"
    url = "/about/"
    weight = 2
要想在本地预览这个博客界面需要先使用hugo server -D命令启动服务器,才能在浏览器打开这个blog本地文件
使用浏览器访问http://localhost:1313,能看到博客首页说明本地配置ok了
推送至github仓库
新建一个usually-blog仓库
1.提交本地所有文件
git add .
git commit -m "第一次提交博客源码"
## git add 后面的点,代表添加所有文件
2.关联并推送到github
git remote add origin https://github.com/usually885/usually-blog.git
git branch -M main
git push -u origin main
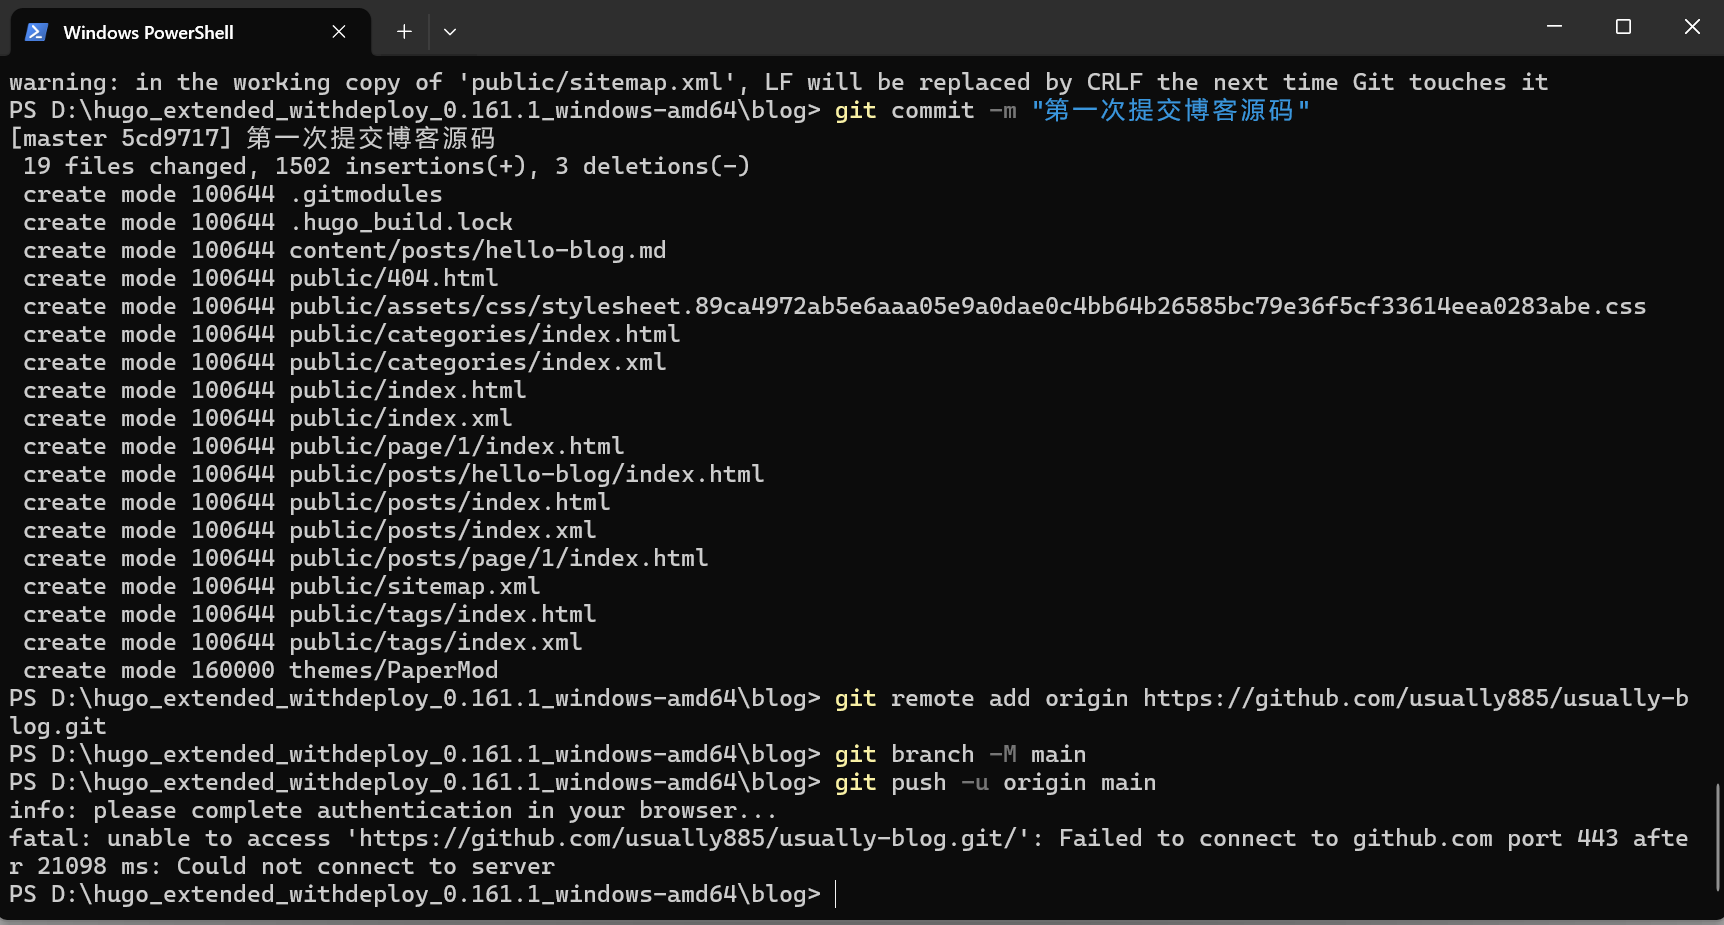
可能会出现这种报错:Git在尝试连接github服务器超时,这是因为终端没挂梯子
git config --global http.proxy http://127.0.0.1:7897
git config --global https.proxy http://127.0.0.1:7897
去设置代理里面查代理的端口,给终端挂上梯子就能连上github
连上后重新执行git push -u origin main就会弹终端登录github,成功了就是成功了,仓库就有我们上传的源文件了
配置githubpages+githubActions自动部署
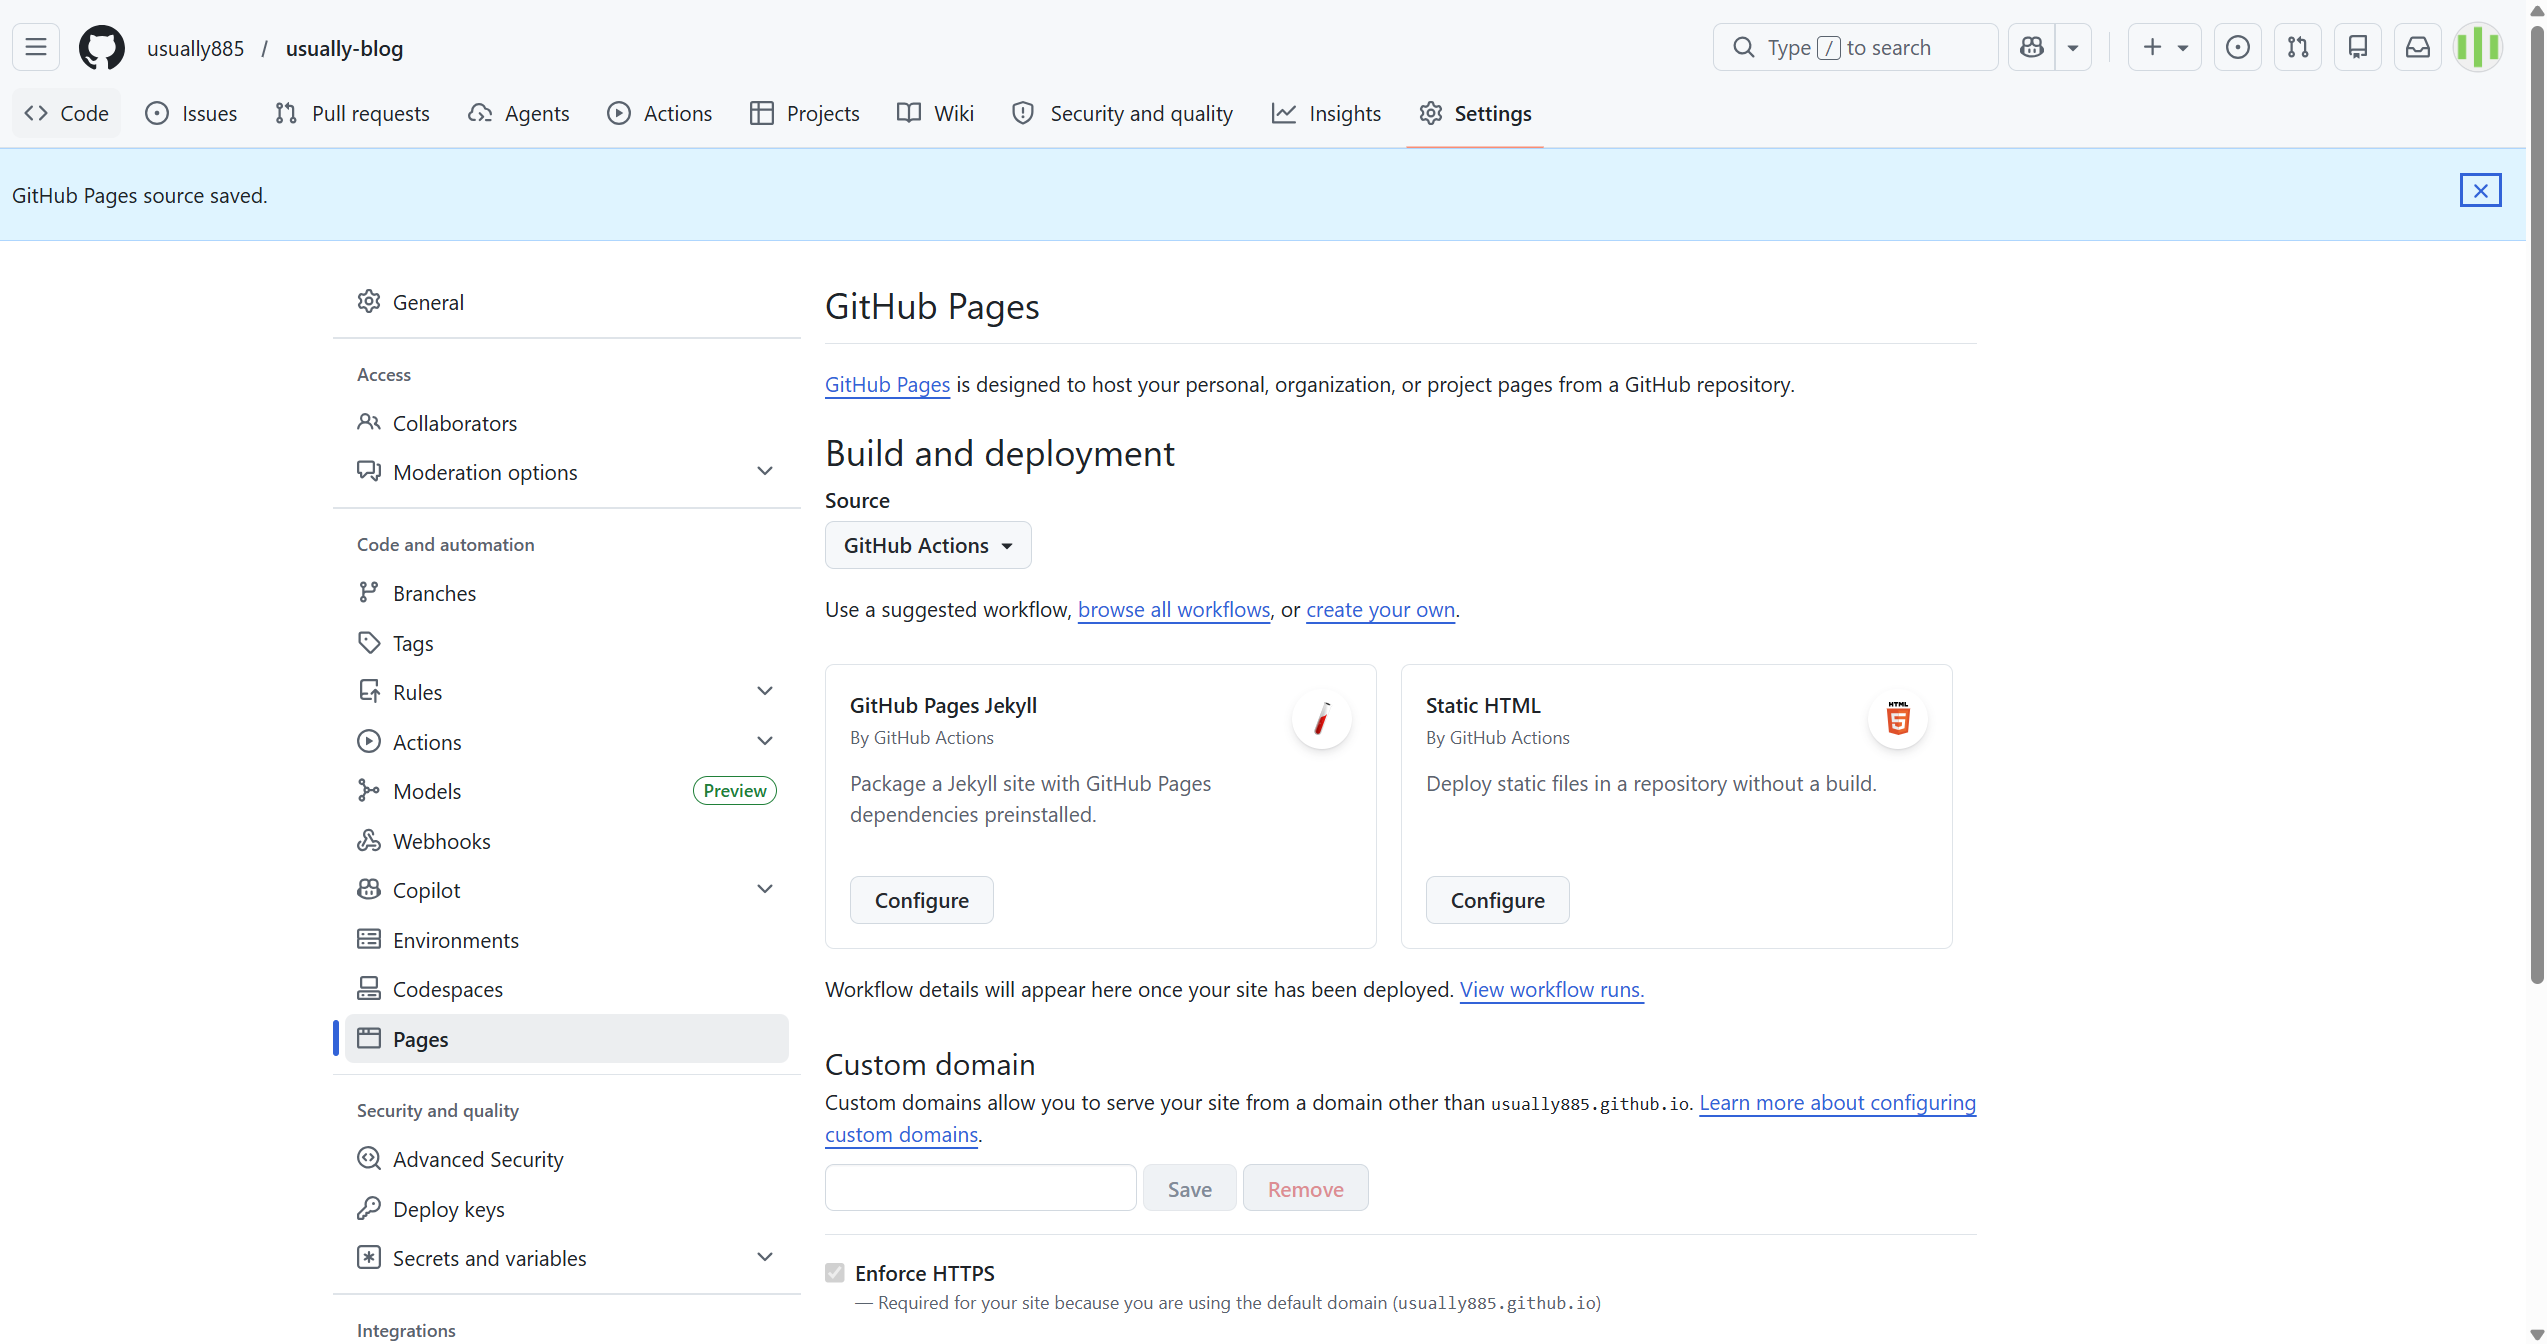
在settings选择pages,在Build and deployment选择GItHub Actions,保存
回到本地blod文件在content文件同级目录创建.github/workflows/hugo.yaml文件,复制如下内容
# 用于构建和部署 Hugo 网站到 GitHub Pages 的示例工作流
name: 发布Hugo网站到Pages

on:
  push:
    branches:
      - main
  workflow_dispatch:

permissions:
  contents: read
  pages: write
  id-token: write

concurrency:
  group: "pages"
  cancel-in-progress: false

defaults:
  run:
    shell: bash

jobs:
  build:
    runs-on: ubuntu-latest
    env:
      # 精准匹配你本地的 Hugo 版本
      HUGO_VERSION: 0.161.1
    steps:
      - name: 安装 Hugo CLI
        # 【修复点】:这里加入了 env. 前缀
        run: |
          wget -O ${{ runner.temp }}/hugo.deb https://github.com/gohugoio/hugo/releases/download/v${{ env.HUGO_VERSION }}/hugo_extended_${{ env.HUGO_VERSION }}_linux-amd64.deb \
            && sudo dpkg -i ${{ runner.temp }}/hugo.deb

      - name: 安装 Dart Sass
        run: sudo snap install dart-sass

      - name: 检出代码
        uses: actions/checkout@v4
        with:
          submodules: recursive
          fetch-depth: 0

      - name: 配置 GitHub Pages
        id: pages
        uses: actions/configure-pages@v5

      - name: 安装 Node.js 依赖
        run: "[[ -f package-lock.json || -f npm-shrinkwrap.json ]] && npm ci || true"

      - name: 使用 Hugo 构建
        env:
          HUGO_ENVIRONMENT: production
          HUGO_ENV: production
        run: |
          hugo \
            --gc \
            --minify \
            --baseURL "${{ steps.pages.outputs.base_url }}/"

      - name: 上传构建产物
        uses: actions/upload-pages-artifact@v4
        with:
          path: ./public

  deploy:
    environment:
      name: github-pages
      url: ${{ steps.deployment.outputs.page_url }}
    runs-on: ubuntu-latest
    needs: build
    steps:
      - name: 部署到 GitHub Pages
        id: deployment
        uses: actions/deploy-pages@v4
然后提交并推送到github仓库
git add .github/workflows/hugo.yaml
git commit -m "Add Hugo GitHub Pages workflow"
git push
打开github仓库顶部的Actions,会看到一个叫 “发布Hugo网站到Pages” 的工作流已经自动触发了,等他转完就ok了
https://usually885.github.io/usually-blog/以后这个网址就是我的博客首页
本来到这就结束了,但是我发现这个博客上传的图片都显示成了图片链接失效
有两个解决方案
使用static文件夹
Hugo 有一个专门用来存放静态资源(如图片、视频、CSS)的文件夹叫 static。放在这里面的东西,上线后可以直接通过根目录访问。
- 存放图片:在你的
blog根目录下,找到static文件夹。在它里面新建一个文件夹叫images。去你电脑里找到那张名为image-20260523141112176.png(或者.jpg)的图片,把它复制进static/images/里面。 - 修改 Markdown 路径:用代码编辑器打开你的
content/posts/PersonalBlogSetup.md,找到插入图片的那行代码。- 改成:
 - 注意:括号里的路径必须以斜杠
/开头。
- 改成:
- 保存文件,然后重新在终端执行
git add .、git commit -m "fix image"和git push。
页面捆绑法Page Bundles
如果你的笔记图片非常多,全都塞在一个 static/images/ 文件夹里以后会非常乱。Hugo 提供了一种把“文章和它的专属图片”绑在一起的做法。
- 建个专属文件夹:在
content/posts/目录下,新建一个文件夹,名字就叫PersonalBlogSetup。 - 移动文章并改名:把你原来写的那个
PersonalBlogSetup.md文件移动到这个新文件夹里,并且把文件名重命名为index.md。 - 放入图片:把那张
image-20260523...的图片,也直接放进这个新建的文件夹里(和index.md并排放在一起)。 - 极简引用途径:打开现在的
index.md,修改图片链接。现在你只需要直接写图片的名字即可!- 改成:
 - 注意:括号里前面不需要加任何斜杠或文件夹名。
- 改成:
- 保存文件,重新执行 Git 上传三板斧
后续发表博客文章
hugo new posts/你的新文章名.md
git add .
git commit -m "更新博客文章:文章标题"
git push
也可以先在本地blog文件下写好.md文章,然后再去执行git命令提交代码并推送
Comments